
Sauerkraut


Ingredients
1 Cabbage
1 tbsp salt
Equipment (all items clean/sterilised)
Fermenting jar
Chopping board
Sharp knife
Method
- Remove and discard all of the outer leaves of the cabbage so that you are left with the "clean" head from inside only.
- Cut the cabbage in half, then shred thinly and place in a large bowl. Please note that it will seem like a lot of cabbage, however it compacts down substantially after the next step, you will need a very large bowl to hold it initially. Once in the fermenter it doesn't even half fill it.
- Ensure your hands are clean/washed thoroughly.
- Sprinkle the cabbage with the salt.
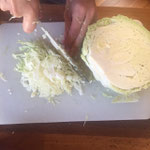
- Now with your hands, squeeze the cabbage whilst mixing in the salt. This process takes about 5 minutes during which you will have squeezed all of the cabbage until it becomes slightly translucent. (picture 2)
- Now to put the cabbage into the fermenter (or other appropriate jar). Take one large handful of the cabbage at a time, and squeeze it like a sponge so that the liquid remains in the bowl, and put it into the fermenter, compacting it down as you go.
- Once all the cabbage is in the fermenter you should have the liquid only remaining in the jar. Make sure there are no loose pieces of cabbage on the sides of the jar above the fill line, and gently pour the remaining liquid over the compacted cabbage.
- Next, fit the fermenter lid, and wind down the plastic squashing plate onto the cabbage as tiqhtly as it will go. This should compact the cabbage further and the liquid will come through it and completely cover the cabbage. This layer is what keeps the cabbage away from the oxygen and enables it to ferment rather than spoil as fermentation is an "anaerobic" (oxygen free) process, and the cabbage shouldn't come into contact with spoilage microbes which relly on oxygen to survive.
- The fermenter can now go somewhere to ferment for about 3 days, ideally on the bench or on top of the fridge where it won't be bumped around a lot.
- Please note that you will need to release the gases (Carbon dioxide) produced by the fermentation at least once daily, I like to do it in the morning and late evening to avoid the risk of them building up too much and breaking the fermenter. This process is called "burping" the ferment.
- After 3 days your ferment should be done, and you can remove the sauerkraut and pop it into jars in the fridge to eat whenever you like over the next few weeks. Ensure you clean the fermenter thoroughly so it's fresh and ready for your next batch!
Enjoy your product cold as a small side to your meal, through salads, on sandwiches, or in a little tub as a snack etc. Or you can cook it up in a traditional German manner, our Nutritionist - Tracy has a great family recipe for this. If your gut is new to fermented foods take it easy to start with as you may need to get used to the pre & probiotic effects, no need to rush it.
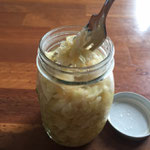
Notes: Your ferment will smell pleasantly sour over the days to come, and the cabbage colour will dull, but not substantially, I have shown a final picture of what it is likely to look like, although batches can vary slightly. You will notice tiny bubbles of gasses in the ferment, and the product does soften slightly, all of these signs are normal and signs the ferment is coming along nicely.
If anything goes wrong with your ferment you will know about it! It will smell terrible, really terrible, and there will be colour changes that are obvious e.g. bright mould colours such as yellow, orange and red to black and green. If any of this happens discard the product immediately, don't taste it - it will be revolting!